
Our service requires that you provide correctly sized and formatted artwork.
We DO NOT resize artwork to match mockups as part of our service.
Use the tabs below to find information about size, resolution, file format, and tips on preparing your artwork. We recommend ordering sample shirts to test your image quality. Incorrectly formatted artwork may result in your order being placed on hold and cause delays in order processing.
-
General File Requirements: These requirements apply to all of our products unless otherwise noted on the product specifically:
- Fully Opaque Artwork* (non transparent colors)
- Merged to One Layer (delete all invisible layers and merge remaining layers)
- Sized to Print
- 300 DPI
- Transparent background, no background (not the same thing as using transparent artwork)
- Clean art without jagged lines
*Wherever an image uses transparency it will print a solid white because a white underbase is required on all colored shirts
Print File Types:
- .psd
- .png*
*.png files only use an RGB color profile, some color shifting may occur when the files are converted to CMYK for printing
Color Profile
All apparel and posters are printed in the CMYK color profile. When setting up your file make sure it is in CMYK rather than RGB. The reason for this is that a CMYK printer is not able to print all the colors in the RGB color space. All phone cases are printed in RGB.
Resolution
All garments are printed at 300 DPI. Any images that are NOT 300 DPI are not guaranteed for final size. If your image is only 200 DPI our machines may reduce the size of your final print.
Merge Layers
When uploading .PSD files, please make sure that all of your layers are merged before uploading artwork. If your layers are not merged, your image will be uploaded as only one layer, and not the entire image. Do not flatten artwork if you desire transparency to remain intact. For more information please see our merge vs flatten video below.
-
Templates & Requirements
-
APPAREL
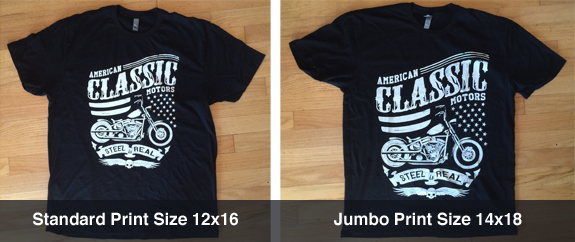
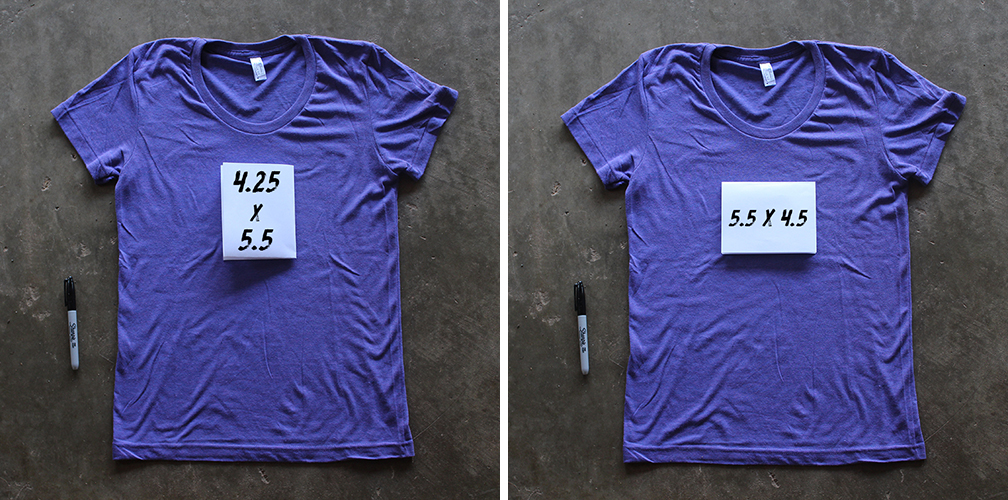
You can upload the template image with or without trimming the transparent background. Using the 12x16" template as an example if you filled up the ENTIRE template your design would print at 12x16". If you filled exactly half your image would print at 6"x8" so the blank area doesn't actually get printed. Files are print AT the size provided. We do not resize artwork based on the size of the garment.Style Resolution Standard Front Print Oversided Print Adult T-Shirts/Crew Sweatshirts 300 DPI 12" W x 16" H 14" W x 18" H * Hooded Sweatshirts (front) 300 DPI 12" W x 10" H N/A Youth T-Shirts 300 DPI 8.5" W x 9.5" H N/A Toddler T-Shirts 300 DPI 8" W x 9" H N/A Infant Apparel 300 DPI 7"W x 7" H N/A Crop Tops 300 DPI 11" W x 7" H N/A Pants 300 DPI 7" W x 16" H N/A Full Pocket Prints (Allover) 300 DPI 6"W x 6"H N/A
* Note: We can not print oversized prints on the front of hoodies, any kids, any baby, or women's sizes. Jumbo prints cost an additional $2.25 per print.
Hoodies
- The maximum image size is 12" W x 10" H
- We cannot print jumbo/oversized prints on the front of hoodies
Pocket Prints
- Pocket Template
- 6" W x 6" H for all over pocket print
- Keep detailed artwork/text inside 4.5"x4.5"
-
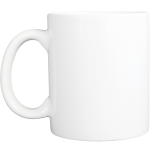
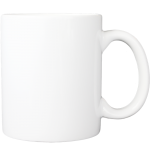
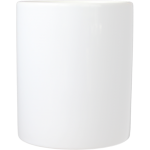
MUGS
Style Resolution Requirement Standard Front Print 11oz Mug 300 DPI 8" W x 3" H Mockups
Use the following images for mug mockups. Click each mug image to open the full size image in a separate window.
Mug Left
 Mug Right
 Mug Center
-
APRONS
Style Resolution Requirement Standard Front Print 2 Pocket Apron 300 DPI 9" W x 9" H -
BAGS
Style Resolution Requirement Standard Front Print Standard Back Print BAGedge (BE008) 300 DPI 8" W x 8" H 8" W x 8" H BAGedge (BE007) 300 DPI 11" W x 11" H 11" W x 11" H BAGedge (BE009) 300 DPI 12" W x 9" H 12" W x 9" H BAGedge (BE004) 300 DPI 4.5" W x 4.5" H 4.5" W x 8" H econscious (EC8040) 300 DPI 11" W x 11" H 11" W x 11" H econscious (EC8050) 300 DPI 11" W x 11" H 11" W x 11" H -
PHONE CASES
In an effort to make creating print-ready artwork as simple and easy as possible, we have provided some phone case artwork templates. These templates are preset to match the artwork requirements specific to each case and phone model. All you have to do is paste in your art and position your artwork accordingly. Follow the steps below to use our artwork templates:1. Download the phone case template you want to offer in your store.
2. Open the template in Photoshop.
3. Paste your artwork into the template in a separate layer.
4. Move your artwork layer under the template layer.
5. The blank areas represent when your artwork will be printed on the case. Adjust your artwork accordingly.
6. Delete the case layer so only your art is left.
7. Save the file as a .png. -
POSTERS
Please ensure that your images are provided at size, with no extra bleed.- Images can be oriented in either Portrait or Landscape.
- Resolution must be 300 DPI
- Set your color profile to CMYK.
- .PDF files preferred
Poster Size Full Bleed Pixels Full Bleed Doc Photoshop Templates 8 x 10 2400 px x 3000 px 8" x 10" Download 12 x 12 3600 px x 3600 px 12" x 12" Download 12 x 16 3600 px x 4800 px 12" x 16" Download 12 x 18 3600 px x 5400 px 12" x 18" Download 16 x 20 4800 px x 6000 px 16" x 20" Download 18 x 24 5400 px x 7200 px 18" x 24" Download 24 x 36 7200 px x 10800 px 24" x 36" Download -
PILLOWS
-
-
We recommend that you provide us with mockups of how you envision your t-shirt designs to look on the shirt. Mockups are mainly used for placement, and can be helpful if there is a large discrepancy between the size of your artwork and the size of the artwork in the mockup image. Mockups are printed on black and white job tickets and cannot be used to determine color during the printing process.
It is important to remember that we use the print file you submit with your orders to print your item, NOT the mockup. Please make sure you submit BOTH a print file and a mockup file. Make sure the size, color, and design match. If the print file does not match the mockup your order may be placed on hold or printed incorrectly.
If you find yourself resizing your print file in the mockup tool, it is a key indicator that you must also make the same changes to your print file, or save the print file that is generated by the mockup tool once you have made changes using the tool. However, please note that making a graphic larger will result in a loss of resolution and we cannot guarantee the quality of your print if you do so.
A mockup is not required for an order, however if no mockup is given, we will place the graphic centered and 2" below the collar by default.
Guide to creating mockups
-
Common Questions about Printing
-
What is the difference in size between standard and jumbo printing?
-
Do you print white?
We only print the color white on non-white garments. We actually print a white under base and then print the color on top. On white garments we DO NOT print white, it is stripped and the white comes from the white shirt showing.
-
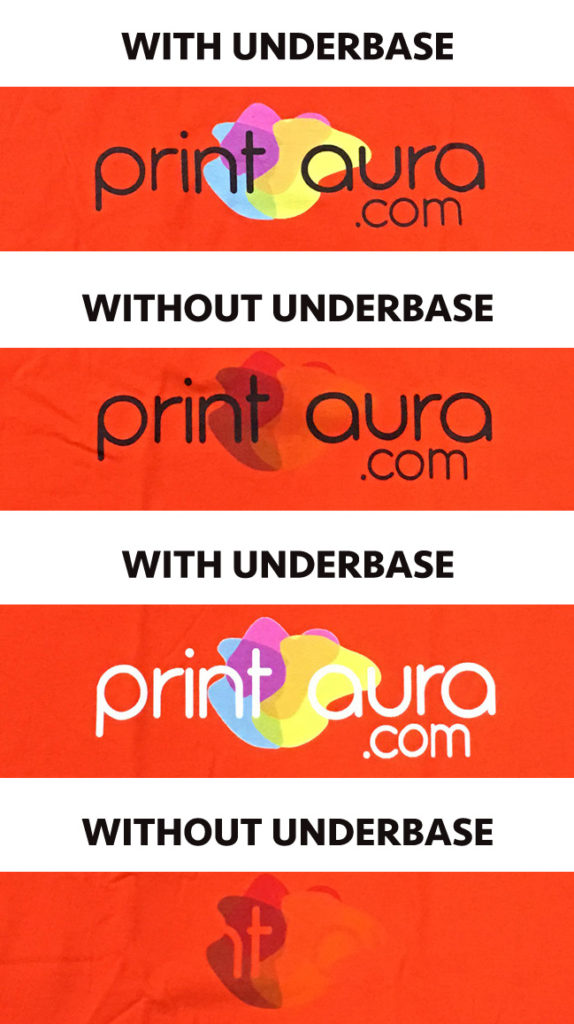
What is Underbase?
Underbase is a layer of white ink that is printed onto the garment before your design is printed. Just as an artist begins with a white canvas, your artwork also needs a blank white underbase to show the colors of your design in true, vibrant hues. Without it, the color of the shirt effects the hue and vibrancy of the ink as it is laid on the shirt directly.All non-white garments print a white underbase before the color artwork layer by default. Black shirts, or any very dark shirt MUST have an underbase in order for the artwork to appear on the shirt.
Attempting to print on colored shirts without an underbase only works to achieve a vintage or faded look on lighter colored shirts, such as light blues, yellows, tans, light greys, pinks, etc. We cannot guarantee the results when you choose "no underbase" on colored shirts, and you may find it necessary to order tests of your design, or color swatches printed on various colors of shirts. The pictures below are a comparison of the vibrancy of the colors when using/not using an underbase
-
Print Locations
We offer front and back printing on most t-shirts in standard print locations. We currently do not offer sleeve printing or printing across seams. On v-neck designs we currently only print below the V even on the back of the t-shirt to ensure a flat surface for printing. For hoodies, we print on the front above the pocket and on the back above the front pocket. -
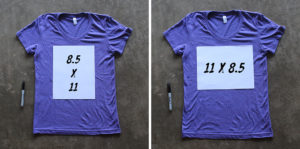
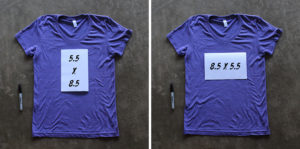
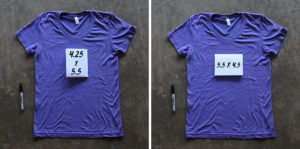
How big should my design be?
Try our mockup tool get a rough idea of how big your image will be.
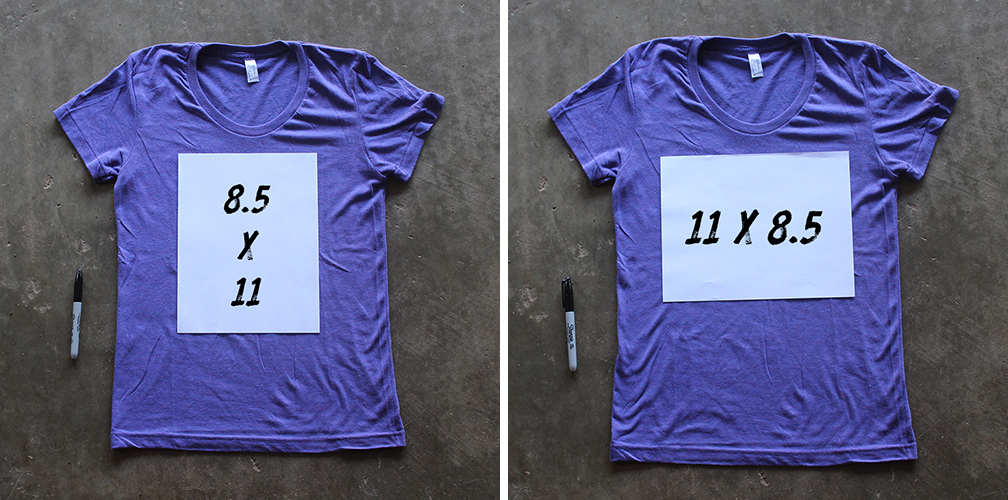
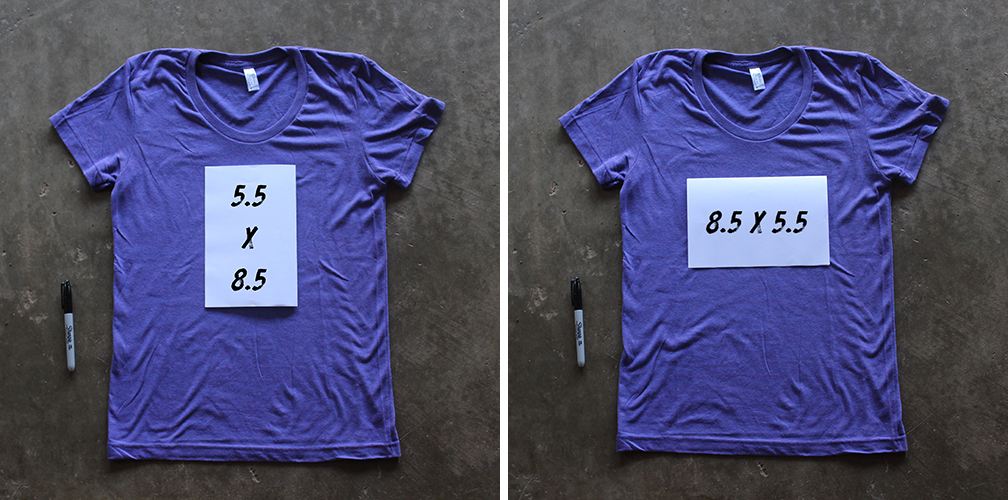
Well, good question...as big as you want it under 12" x 16" but here is a handy tip we use here to get a visual idea of how big a t-shirt design should be. If you lay down your favorite t-shirt and then take a regular 8.5" x 11" piece of paper and lay it down on the shirt. You can even rotate it to get an idea of how big 8.5" or 11". Many t-shirt designs are somewhere between that 8" and 11" width depending whether your design is text or some other graphic.
-
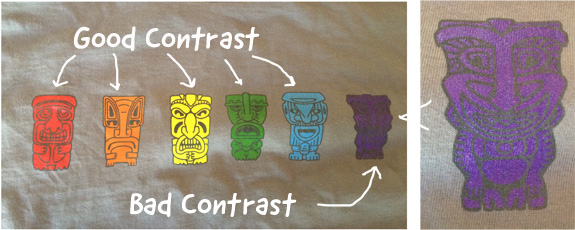
Design Contrast
Make sure your design has enough contrast between colors. Dark colors next to colors don't look the same as they may on your backlit computer screen. In the example below, the colors in contrast to the black outlines are quite viewable but as you can see the darker purple just doesn't pop like the other colors. A better solution would be a lighter purple to make sure the color would pop.
-
Artwork Services
We expect our clients to provide print ready images formatted to be printed. We currently do not offer graphics services for sizing, cleaning, or altering our clients art. We are not responsible for low quality or incorrectly sized submitted art.
-
Transparency
Underbase can cause problems for designs with standard transparency. The underbase is only printed underneath your design, and it is not transparent. For example, if part of your artwork is 50% transparent, the white underbase will still print at 100% opacity under it, making any transparent parts appear solid white. Using transparent artwork often leads to very unexpected results, depending on the amount and degree of transparency used in the design.
How do you avoid this issue?
There are a couple of options to avoid the transparency problem:- Only print designs with transparencies on light garments and choose NO underbase. (But keep in mind the other non-transparent parts of the design will have a slightly faded or vintage look without the underbase)
- Only use fully opacity in your designs. You can try to achieve a similar look to transparency by painting your artwork with a solid color base and then use shading or gradient techniques to achieve the look you want.
- Another option for fading your design into the shirt is to feather the edge of the design using a layer mask.
- Use a dissolve photoshop effect on your drop shadows
- Another option is to put a background layer underneath and/or around your artwork that can be any color, or combination of colors.. This will in essence try to cover the underbase with the shirt color, so that it won’t show through. Adding a background solves the issue because the transparency is printed onto the background, not the white underbase.
Example
This is how a white transparent glow shows up when printed on a garment.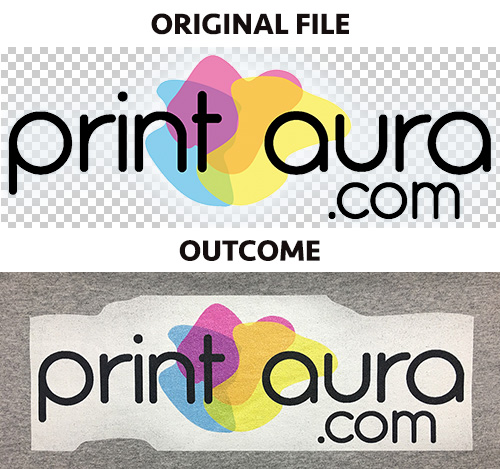
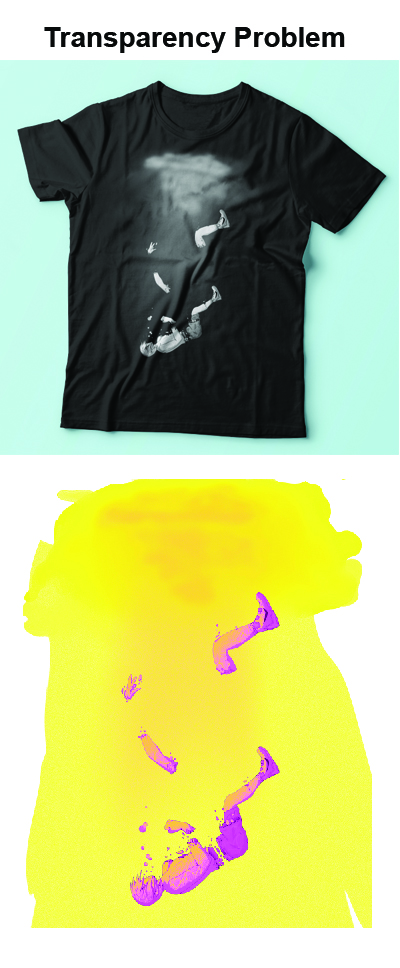 This member was having issues getting the transparency of their design to print as they had imagined. But they were able to achieve the effect they desired, by adding a new background element to the design, even on a black shirt!
In this photo on the left, the milky white haze in the design was transparent, and surrounded the entire design. The second photo shows how the artwork looks when it is prepared for the printers, everything that appears solid yellow will actually print a solid white. The yellow you see is the underbase layer applied to the design. As the picture shows, this is not at all what the designer imagined he was creating!
In this set of images below you can see the artist's work-around for the transparency. He actually incorporated a black background and added visually interesting elements that make it appear to encapsulate the design. The result is even more stunning than the original, and he solved his transparency problem by laying black background on top of the underbase and underneath the transparent layer. The bottom image shows that this design will print as intended with no solid white ink around the design.

-